webpack string replace for HTML files

tldr; I wrote a plugin called html-webpack-string-replace-plugin to do string replacements in HTML using the amazing HtmlWebpackPlugin.

We do an obscene amount of string replacements in our project, mostly due to differences between environments and the fact that we’ve grown a lot and never really went back to address this situation. Yep, good ol’ tech debt. We have placeholder strings in our JS, TS and even LESS/SCSS. Luckily when we switched to webpack, we were able to use the StringReplacementWebpackPlugin and it worked like a charm! Thanks to jamesandersen for creating and maintaining it!

There was however a gap - we also had placeholder text in our HTML - mostly just the app’s main index.html, but we didn’t have a great solution for it. Enter HtmlWebpackPlugin! Prior to using this plugin, we were copying our main html file, initially using Grunt, and now using CopyWebpackPlugin. The HtmlWebpackPlugin includes a lot of options we aren’t yet using, like injection, favicon, and interpolation of EJS, pug and other templating engines. Of course we are working with a system that has existed for several years, so switching over to using a templating engine isn’t going to work… too many places to change. So I ventured off to see if I could write a plugin that could transform the html file and make the string replacements along the way. Having never written a webpack plugin before, I was skeptical… but it turns out it was scary simple! Hooking into the html-webpack-plugin-before-html-processing event I wrote a plugin that allows developers to easily perform the same string replacements in HTML that we are able to do in other files with the StringReplacementWebpackPlugin. And here it is: https://www.npmjs.com/package/html-webpack-string-replace-plugin

1
$ npm install -D html-webpack-string-replace-plugin

webpack.config.js

1
2
3
4
5
6
7
8
9
10
11
plugins: \[
new HtmlWebpackPlugin({
"template": "./src/input.html",
"filename": "./output.html"
}),

new HtmlWebpackStringReplacePlugin({
'\_VERSION\_': '1.0',
'\_CDN\_': 'https://some-cdn'
})
\]

input.html

1
2
3
4
5
6
7
8
<html>
<head>
<title>My App Version \_VERSION\_</title>
<script src="\_CDN\_/foo.js"></script>
</head>
<body>
</body>
</html>

output.html

1
2
3
4
5
6
7
8
<html>
<head>
<title>My App Version 1.0</title>
<script src="https://some-cdn/foo.js"></script>
</head>
<body>
</body>
</html>

I hope this plugin turns out to be useful for others! If you’re curious you can follow along with my teams conversion to use webpack, or follow me on twitter.
Bundling AngularJS without editing thousands of files - Journey to webpack - part 7

New to the journey? Start from the beginning

Now that we’ve gotten our 2nd and 3rd party libraries, including momentjs bundled with webpack, it’s time to move onto our main application code. As I’ve mentioned, we’ve amassed a fairly large AngularJS (1.x ) application without a module system like CommonJS or AMD, so the options for how to best bundle them with webpack are limited. Currently we use Grunt to build up separate modules for each feature, which allows us to only download the code for features that the user has permission. The thought of modifying 1000s of JS files didn’t sit well with anyone, so we didn’t even start down that path. Now, if you have a code base that is fairly small, this might be the quickest path forward. AngularJS (1.x), unlike Angular (2+), doesn’t have any real concept of an “entry point” which is an important piece to the webpack config. Basically, you point webpack at your entry point, and it chases down the dependencies by following any require or import statements it finds along the way. With that in mind, my teammates came up with the following method to “properly” require all necessary files to make webpack happy:

1
2
3
4
5
6
\# ./entry-points/feature1.ts
export const importAll = (r: any): void => {
r.keys().forEach(r);
};
importAll(require.context('./app/feature1', true, /module\\.js$/));
importAll(require.context('./app/feature1', true, /(^(?!.*(spec|module)\\.js).*\\.js)$/));

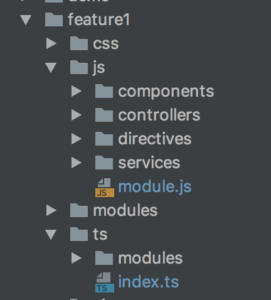
directory layout With this little snippet, we’re able to require every file in the ./app/feature1 directory, ignore any spec files or spec-helpers, and very importantly, referencing the module.js first. *module.js *is our teams standardized filename for defining any AngularJS modules. So our webpack config can point to this file:

1
2
3
entry: {
'feature1': './entry-points/feature1.ts'
}

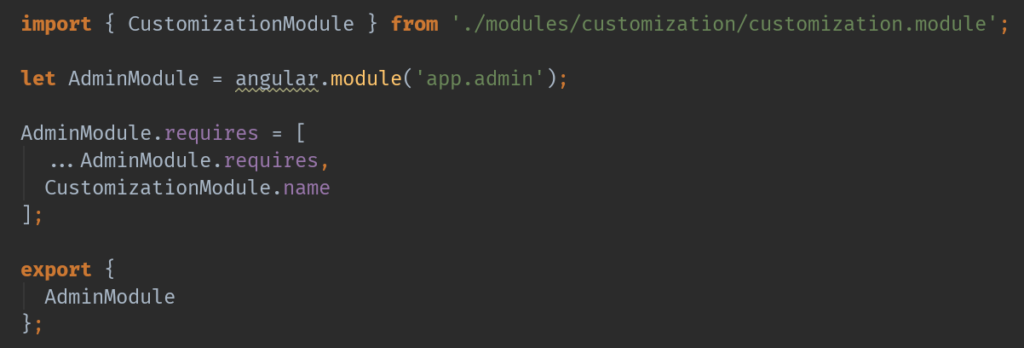
And generate a feature1.js output file that contains all of the non-test code! So, we repeated this pattern for about 15 feature directories, and were able to generate the same bundles that we manually had put together with grunt tasks and globs. One bonus we found as we put this together was that any code that had been converted to TypeScript didn’t need to be part of this entry file. The way that we write our TS files, we always create a barrel that contains imports *of any TypeScript modules, classes, constants, etc. So, for anything that was already converted to TypeScript, we just needed to use the barrel as the *entry point to let webpack chase the dependencies. Of course we have many features that are part JS and part TS, in that case the entry point looks like this:

1
2
3
entry: {
'feature1': \['./entry-points/feature1.ts', './app/feature1/ts/index.ts'\]
}

Where the first element of the array contains the JS parts of the feature, and the second points at the top level barrel for the TS parts of the feature! feature1.ts (module barrel) Shout out to my teammates Tor, Pramod & Greg for supplying the brain power for this!

A quick update to our TODO list:

  1. Create vendor.min.js
  2. Create app-components.min.js
  3. Create app.min.js
  4. Create templates.app.min.js
  5. Try out webpack 3.0!
  6. Figure out what’s up with moment.js
  7. Use the webpack’d files in karma for unit tests
  8. Try the CommonChunksPlugin
  9. Handle CSS/LESS/SASS
  10. Use the dev-server instead of grunt-contrib-connect