New to the series? Start at the beginning
As we continue on our journey to convert Grunt to webpack, I realized I missed a few things that are probably useful.
 uglification
- source maps
- split dev & prod
- helper files
- ng-upgrade
- CommonChunksPlugin
- BundleAnalyzerPlugin
ugilfication
Uglification was one of the most straightforward config options we’ve added to webpack. Here’s what we use:
plugins: [
new webpack.optimize.UglifyJsPlugin({
/*eslint-disable camelcase*/
beautify: false,
output: {
comments: false
},
mangle: {
screw_ie8: true
},
compress: {
drop_console: true,
screw_ie8: true,
warnings: false,
conditionals: true,
unused: true,
comparisons: true,
sequences: true,
dead_code: true,
evaluate: true,
if_return: true,
join_vars: true,
negate_iife: false
},
sourceMap: true
/*eslint-enable camelcase*/
}))
]
Of note - the uglification of vendor adds 15 seconds to the build time (from 5sec to 20sec!). We also noticed that sourceMap: true adds ~2 seconds itself, but more importantly we couldn’t find the map files.
sourcemaps
Source maps are a must have. A little digging and we found the proper way to enable sourcemaps within webpack is via:
devtool: ‘source-map’,
Ah, much better :)
split dev & prod
Given how much time uglification adds to the build, we don’t want to run it during development, we really just need it in our production build. We have 2 generally accepted methods of doing this: switching on NODE_ENV or 2 configs. We opted for the 2 configs because our config files were already getting big, and we didn’t want to add lots of if logic. It seemed like it would make it easier to debug. So, off we go:
- Copy webpack.config.js to webpack-dev.config.js and webpack-prod.config.js
- Remove webpack.config.js
- Remove UglifyJsPlugin from the dev config
- Update the ‘webpack’ Grunt task
- Update references to the ‘webpack’ Grunt task
grunt.config(‘shell’, {
webpackDev: {
command: ‘node node_modules/webpack/bin/webpack –config webpack-dev.config.js –progress’,
options: {
execOptions: { cwd: ‘.’},
async: false, stdout: true, stderr: true, failOnError: true
}
},
webpackProd: {
command: ‘node node_modules/webpack/bin/webpack –config webpack-prod.config.js –progress’,
options: {
execOptions: { cwd: ‘.’},
async: false, stdout: true, stderr: true, failOnError: true
}
},
This keeps our development build blazing fast!
Helper files
I’m not fan of duplication. Early on with all the work we did on the vendor libraries made our config file huge and it looked like we were doing the same things over & over. So we created vendor-helper.js. The immediate purpose of this file was to extract the repetitive expose-loader configurations, making our main config file more readable.
module.exports = {
exposeLoaderConfig: [
{
name: ‘lodash’,
global: ‘_’
},
{
name: ‘moment’,
global: ‘moment’
},
{
name: ‘fastclick’,
global: ‘FastClick’
},
{
name: ‘angular’,
global: ‘angular’
},
{
name: ‘d3’,
global: ‘d3’
},
{
name: ‘log4javascript’,
global: ‘log4javascript’
},
{
name: ‘highcharts’,
global: ‘Highcharts’
}
],
getSimpleGlobals: function() {
return this.exposeLoaderConfig.map((config) => {
return {
test: require.resolve(config.name),
use: [
`expose-loader?${config.global}`
]
};
});
}
};
Then in the main config file:
const VendorHelper = require(‘./webpack-config/vendor-helper’);
module: {
rules: {
…VendorHelper.getSimpleGlobals(),
Boom! We just made the config file that much smaller and more readable, getting those pesky libraries that need special handling out of our way. We don’t need to see that every day, so shoving them off to the side has brought a sense of calmness and clarity that we were missing… or something like that :) While we’re in the business of extracting stuff, the verbosity of the config for the UglifyJsPlugin was bothersome, so we move it to a plugin-helper.ts. Again, this is something you essentially “set and forget”, and it takes up a lot of real estate in the editor. Because of our pre-existing Grunt infrastructure, we have an environment variable called USE_MINIFIED, so we’ll piggy back on that to tell us whether or not we should uglify.
const webpack = require(‘webpack’);
module.exports = {
getUgilifyConfiguration: function() {
let uglifyConfiguration = [];
if (process.env.USE_MINIFIED === 'true') {

  uglifyConfiguration.push(
    new webpack.optimize.UglifyJsPlugin({
      /\*eslint-disable camelcase\*/
      beautify: false,
      output: {
        comments: false
      },
      mangle: {
        screw_ie8: true
      },
      compress: {
        drop_console: true,
        screw_ie8: true,
        warnings: false,
        conditionals: true,
        unused: true,
        comparisons: true,
        sequences: true,
        dead_code: true,
        evaluate: true,
        if_return: true,
        join_vars: true,
        negate_iife: false
      },
      sourceMap: true
      /\*eslint-enable camelcase\*/
    }))
}

return uglifyConfiguration;
}
};
Then in our config file:
plugins: [
…PluginHelper.getUgilifyConfiguration(),
Can you tell we’re into the spread operator over here? :) You might be thinking… Hey I thought you moved to separate config files so you shouldn’t need to extract the uglify config AND have an ENV check, because it’s only in the prod config. Yeah, you are probably right. But we got the feeling that there were going to be more differences in the future…
ng-upgrade
I mentioned before that we have an Angular app we are trying to move our legacy AngularJS code base towards. Thus far we are using ng-upgrade to downgrade the Angular components to AngularJS successfully. To that end, we need to add these libraries to our webpack config. We have a Grunt task already in place to generate the ng-upgrade(able) bundle, we we’ll add that as an entry point.
entry: {
‘ng-upgrade/dist/bundle.js’: ‘./ng-upgrade/bootstrap-aot.ts’,
We also need to tell the resolver where to look for these files, so we’ll add the following:
resolve: {
modules: [‘ng-upgrade’, ‘node_modules’],
},
The resolve.modules key requires us to also include “node_modules”, which is there by default, but if you specify another path for modules, you have to include it. THen, we need to include the AotPlugin.
plugins: [
new ngToolsWebpack.AotPlugin({
tsConfigPath: ‘./ng-upgrade/tsconfig-aot.json’
}),
Finally, we add the module.rules necessary to use the AotPlugin against our .ts files. Also, because our downgraded components contain style and templates, we need to tell webpack how to handle them. For this, we will simply use the raw-loader.
module: {
rules: [
{
test: /\.ts$/,
loader: ‘@ngtools/webpack’
},
{ test: /\.css$/, loader: ‘raw-loader’ },
{ test: /\.html$/, loader: ‘raw-loader’ },
CommonChunksPlugin
The CommonChunksPlugin is one of those magical parts of webpack that “just works”. We’ll configure it to look for at least 2 common includes before it does the extraction into a separate JS file.
plugins: [
new webpack.optimize.CommonsChunkPlugin({
name: ‘bundle’,
minChunks: 2,
filename: ‘common-chunks/[name].min.js’
})
BundleAnalyzerPlugin
The BundleAnalyzerPlugin says that it generates a representation of “bundle content as convenient interactive zoomable treemap”. Simply put - it’s an amazing, interactive visual of the contents of the files webpack outputs. Setup is really easy:
// eslint-disable-next-line no-unused-vars
const BundleAnalyzerPlugin = require(‘webpack-bundle-analyzer’).BundleAnalyzerPlugin;
plugins: [
new BundleAnalyzerPlugin(),
We put the eslint-disable line in there, because most of the time we don’t want to take the extra time to run it, but it’s nice to have the analyzer only a commented line away. We then modify package.json to give us a quick shortcut we can execute with yarn or npm run
“inspect-common-chunk”: “source-map-explorer build/static/app/common-chunks/bundle.min.js”
“inspect-ng-upgrade-bundle”: “source-map-explorer build/static/app/ng-upgrade/dist/bundle.js”,
Words cannot do this plugin justice… see for yourself: [caption id=”” align=”aligncenter” width=”908”] BundleAnalyzer plugin[/caption] This is a great way to see how your config alters your output. And it’s fun to play with!
todo list
A quick checkin our our todo list shows that we did a bunch of stuff that wasn’t even on the list! This is the nature of working on something unknown, you never quite know what path you will take. It’s still important to have a list - so we all have a target.
- Create vendor.min.js
- Create app-components.min.js
- Create app.min.js
- Create templates.app.min.js
- Try out webpack 3.0!
- Figure out what’s up with moment.js
- Use the webpack’d files in karma for unit tests
- Try the CommonChunksPlugin
- Handle CSS/LESS/SASS
- Use the dev-server instead of grunt-contrib-connect

 But after looking at the BundleAnalyzer, we realized we were bringing in way too many locales. Much has been written about how to do this, so we stood on the shoulders of the giants and made the following changes: We tweaked vendor.ts to include moment instead of moment-with-locale and replaced the IgnorePlugin with this
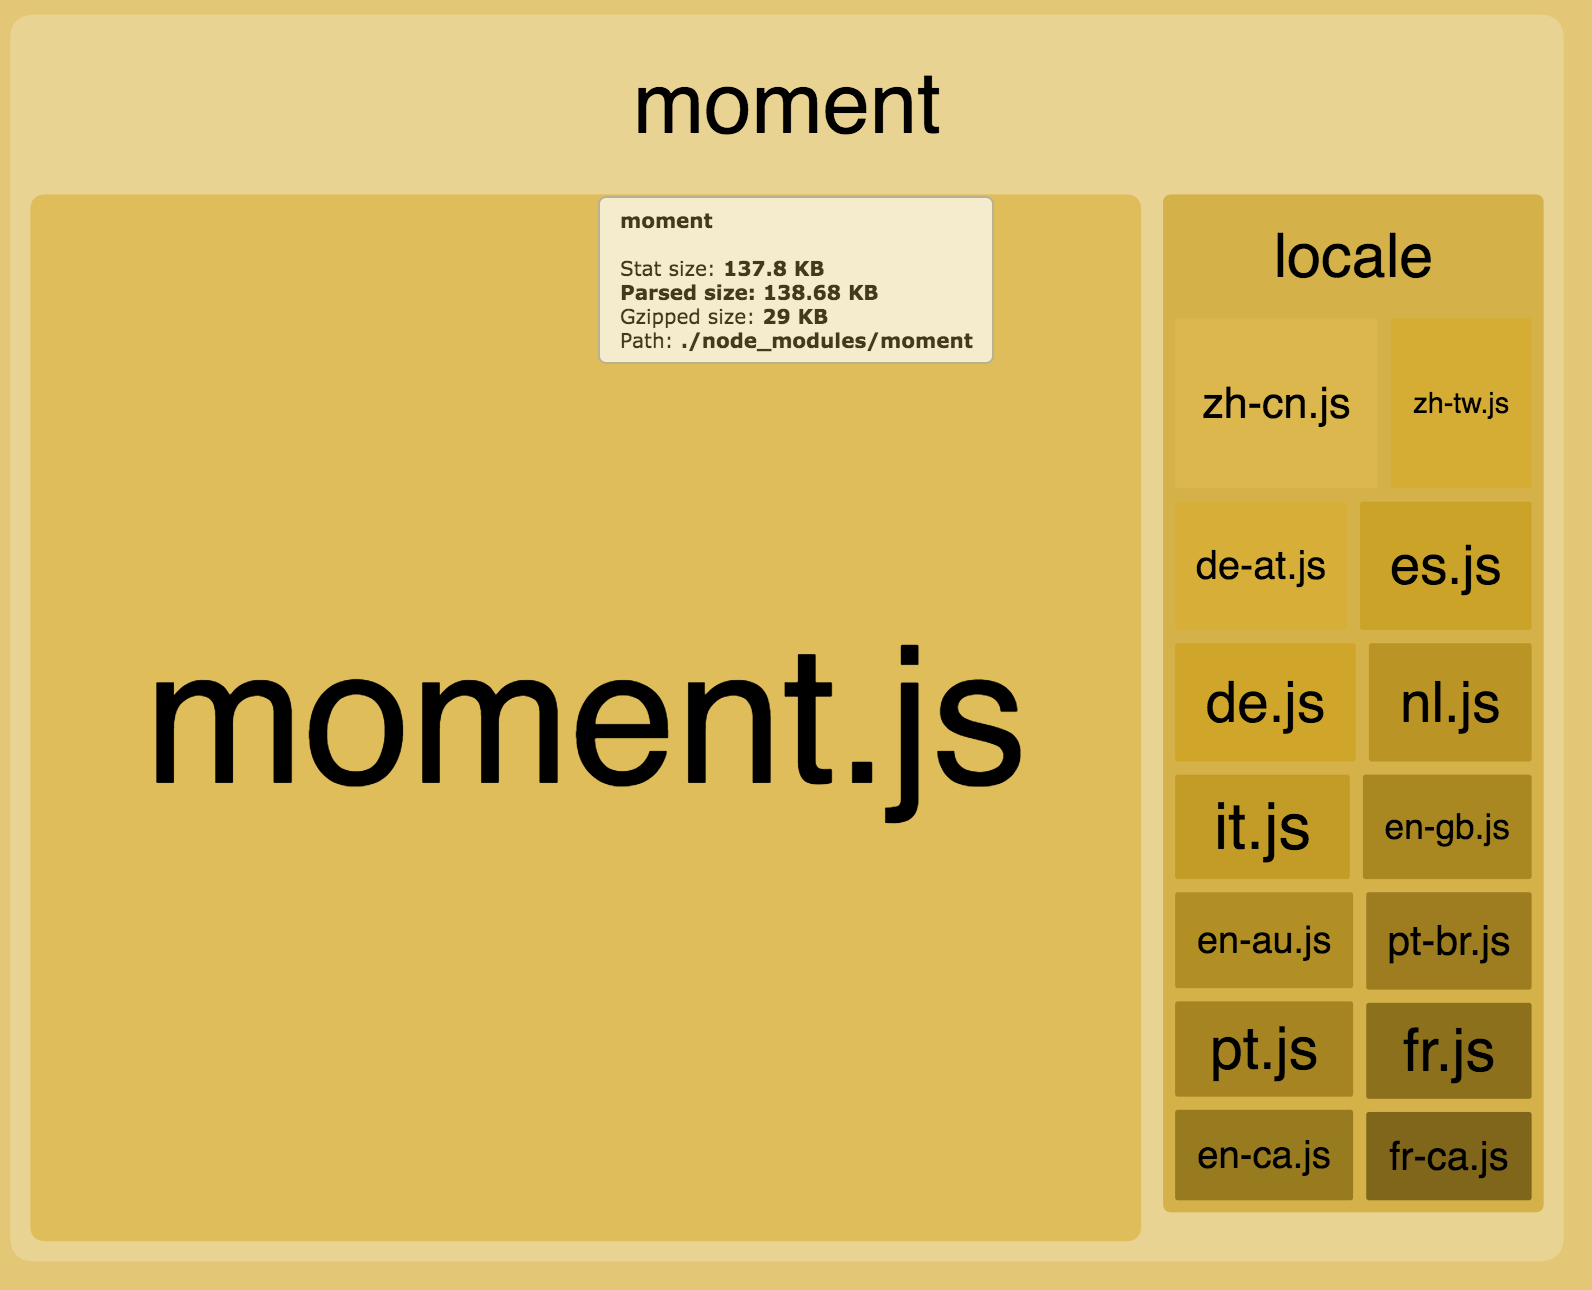
 And that’s the gzip comparison! SHIP IT! A quick update to our TODO list: