I recently upgraded my ios app to Phonegap 2.0 and found the upgrade instructions a little daunting. In an attempt to make them more approachable & consumable, I’ve annotated many of them below.
Please let me know if I missed anything.
Install Cordova 2.0.0
- Download from http://phonegap.com/download
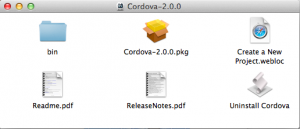
- Unzip the file into ~/pg2.0
- Double click on the ~/pg2.0/Cordova-2.0.0.pkg to begin the installation

Create a new project from the command-line tools - you will have to grab the assets from this new project
- TEMP_PROJ=~/temp_project2.0
~/pg2.0/lib/ios/bin/create $TEMP_PROJ com.temp_project2.0 TempProject
- TEMP_PROJ=~/temp_project2.0
Copy the www/cordova-2.0.0.js file from the new project into your www folder, and delete your *www/cordova-1.9.0.js *file
- $EXISTING_1_9_PROJ=~/dev/iphone/myapp/ #Set this to the path of the folder that contains your app’s www folder
cp $TEMP_PROJ/www/cordova-2.0.0.js $EXISTING_1_9_PROJ/www
- $EXISTING_1_9_PROJ=~/dev/iphone/myapp/ #Set this to the path of the folder that contains your app’s www folder
Update the Cordova script reference in your www/index.html file (and any other files that contain the script reference) to point to the new cordova-2.0.0.js file
Copy the “cordova” folder from the new project into your project’s root folder (if you want the project command-line tools)
- cp -r $TEMP_PROJ/cordova/ $EXISTING_1_9_PROJ/www
Add a new entry under Plugins in your Cordova.plist file (under the Supporting Files group) - the key is Device and the value is CDVDevice
Edit Cordova.plist, to include Device/CDVDevice like so, (or edit the file in Xcode)
Plugins Device CDVDevice Logger
Remove Cordova.framework
- Select *Cordova.framework *in Xcode then Edit -> Delete, then select Remove Reference
Remove verify.sh from the Supporting Files group
- Select verify.sh in Xcode Select in *Cordova.framework *in Xcode
Select the project icon in the Project Navigator, select your project Target, then select the “Build Settings” tab
Search for “Preprocessor Macros”, then remove all “CORDOVA_FRAMEWORK=1” values
Locate the CordovaLib folder that was installed in your hard-drive under your home folder’s Documents sub-folder.
Locate the CordovaLib.xcodeproj file in the CordovaLib folder, then drag and drop the file into your project - it should appear as a sub-project.
Build your project, you should get some errors relating to #import directives
For the #import errors, change any quote-based imports in this style:
#import “CDV.h”
to this brackets-based style:
#import <Cordova/CDV.h>
and remove any #ifdef wrappers around any Cordova imports, they are not needed anymore (the imports are unified now)
Build your project again, and it should not have any #import errors.
- You will still have build errors, they will get cleaned up shortly
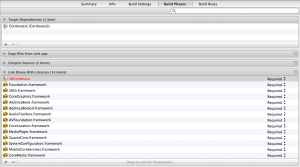
Select the project icon in the Project Navigator, select your project Target, then select the “Build Phases” tab
Expand the “Target Dependencies” phase, then select the “+” button
Select the “CordovaLib” target, then select the “Add” button
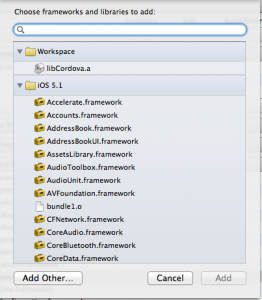
Expand the first “Link Binary with Libraries” phase (it should already contain a bunch of frameworks), then select the“+” button
Select the libCordova.a static library, then select the “Add” button
Delete the “Run Script” phase.
- Click the X to the right of the Run Script section title and confirm deletion
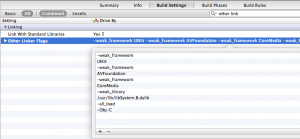
Select the project icon in the Project Navigator, select your project Target, then select the “Build Settings” tab
Search for “Other Linker Flags”, and add the values -all_load and -Obj-C
Expand the “CordovaLib” sub-project
Locate the “VERSION” file, drag it into your main project (we want to create a link to it, not a copy)
Select the “Create groups for any added folders” radiobutton, then select the “Finish” button
Select the “VERSION” file that you just dragged in a previous step
Press the key combination Option-Command-1 to show the File Inspector (or menuitem View -> Utilities -> Show FileInspector)
Choose “Relative to CORDOVALIB” in the File Inspector for the drop-down menu for Location
Build your project, it should compile and link with no issues.
Select your project from the Scheme drop-down, and then select “iPhone 5.1 Simulator”
Select the Run button
NOTE 1: If your project is not working as expected in the Simulator, please take a note of any errors in the console log in Xcode for clues. NOTE 2: For the unified #import headers to work, the build products should build into the same build directory. You may need to set the preference “Xcode Preferences -> Locations -> Derived Data -> Advanced…” to “Unique”


